Angular Fundamentals
Components
Purpose: The main building block for application. The user interface (application) is built by combining components.
Component consists of three main parts:
- ViewModel class on TypeScript (user-info.component.ts) - defines model for view with properties and some logic
- View template (user-info.component.html), Must have it: external or inline template.
- Styles (user-info.component.css)
user-info.component.ts:
import { Component } from '@angular/core';

@Component({
  selector: 'app-user-info',
  templateUrl: './users/user-info.component.html',
  styleUrls: ['./users/user-info.component.css']
})

export class UserInfoComponent {
  private address: string;

  // constructor
  constructor(public name: string, public email: string, age?: number) {}

  // method
  public getEmail(): string {
      return this.email;
  }

  // getter property
  get address(): string {
      return address;
  }
}
In examples below I will refer to this user-component.
@Component({...}) is decorator.
Decorators allow to attach some additional information to a class. Decorator is a TypeScript feature.
Components should be registered in Modules, usually in AppModule:
import { UserInfoComponent } from './users/user-info.component';

@NgModule({
  declarations: [
    UserInfoComponent
  ]
})
Selectors
Selector actually works like a CSS selector.
<!-- Element selector - selector: 'app-user-info' -->
<app-user-info></app-user-info>
selector: 'app-user-info'
<!-- Attribute selector - selector: '[app-user-info]' -->
<div app-user-info></div>
selector: '[app-user-info]'
<!-- Class selector - selector: '.app-user-info' -->
<div class="app-user-info"></div>
selector: '.app-user-info'

<!-- Not work in Angular
 - id selector
 - pseudo
-->
Lifecycle
- ngOnChanges - Called after a bound input property changes
- ngOnInit - Called once the component is initialized. Runs after constructor.
- ngDoCheck - Called during every change detection run
- ngAfterContentInit - Called after (ng-content) has been projected into view
- ngAfterContentChecked - Called every time the project content has been checked
- ngAfterViewInit - Called after the component’s view (and child views) has been initialized
- ngAfterViewChecked - Called every time the view (and child views) has been checked
- ngOnDestroy - Called once the component is about to be destroyed
Templates
Template expressions guidelines:
- No visible side effects
- Quick execution
- Simplicity
- Idempotence
View encapsulation
View encapsulation defines how styles will be applied to the component: component styles only applied to component template or spread out to other parts.
@Component({
  selector: 'app-user',
  encapsulation: ViewEncapsulation.Emulated
})
ViewEncapsulation:
- Emulated - default, Angular approach (when you see some strange attributes on html elements, like
_ngcontent-c2). Angular applies such attributes to all elements in the component and thereby implementing view encapsulation. - Native - uses Shadow DOM technology
- None - no view encapsulation
Local references
<input
  type="text"
  class="form-control"
  #serverNameInput>

<button
  (click)="onAddServer(serverNameInput.value)">Add Server</button>
#serverNameInput - is a Local Reference and it can be used in any place in the template.
@ViewChild()
Used in TypeScript to get reference to the HTML element.
@ViewChild('serverNameInput', {static: true}) serverContentInput: ElementRef;
serverNameInput - is a local reference and the first parameter of @ViewChild is a Selector.
ng-content
<app-component>
  <p>
    Some content inside component
  </p>
</app-component>
and in component definition:
<div>
  <div class="row">
    <ng-content></ng-content>
  </div>
</div>
@ContentChild - is used if component has content (ng-content)
Databinding
New mental model
HTML attribute vs. DOM property
The distinction between an HTML attribute and a DOM property is crucial to understanding how Angular binding works.
The HTML attribute and the DOM property are not the same thing, even when they have the same name.
Attributes are defined by HTML. Properties are defined by the DOM (Document Object Model).
- A few HTML attributes have 1:1 mapping to properties. id is one example.
- Some HTML attributes don’t have corresponding properties. colspan is one example.
- Some DOM properties don’t have corresponding attributes. textContent is one example.
- Many HTML attributes appear to map to properties … but not in the way you might think!
That last category is confusing until you grasp this general rule:
Attributes initialize DOM properties and then they are done. Property values can change; attribute values can’t.
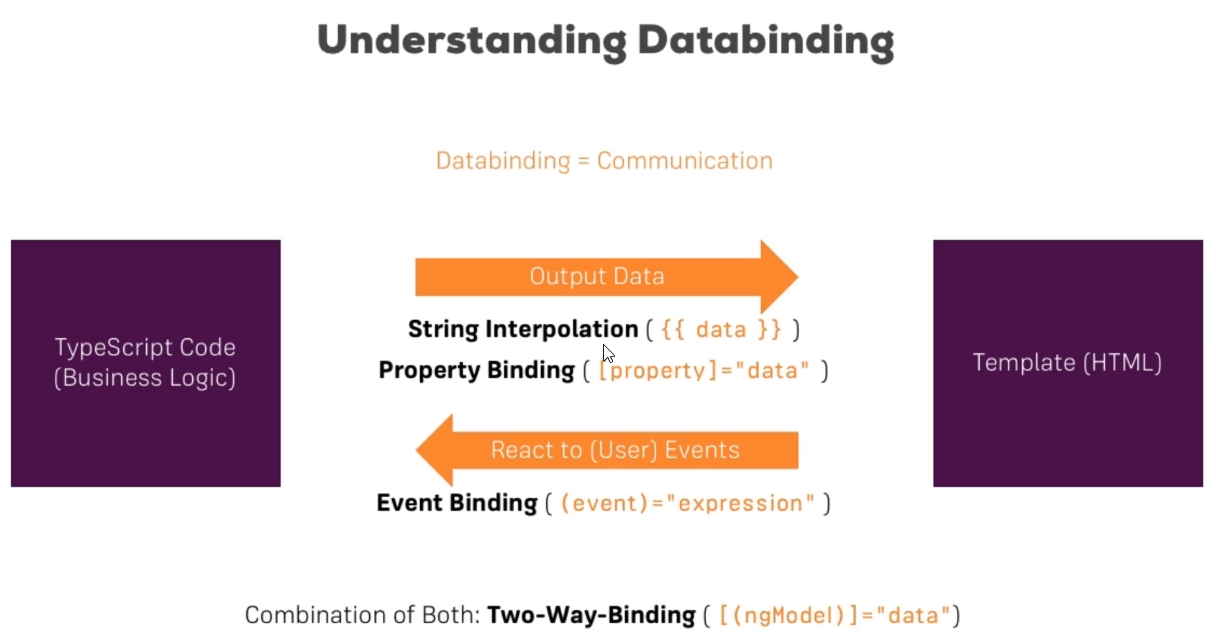
Databinding = Communication between TypeScript code (Business Logic) and Template (HTML).
Code -> Template (Output Data)
- String interpolation:
{{ data }} - Property Binding:
[property]="data"
Template -> Code (React to (User) Events)
- Event Binding:
(event)="expression"
Combination of Both: Two-Way-Binding
[(ngModel)]="data"
String interpolation
Purpose: Display model’s data in view
user-info.component.html:
<div>
    <p>{{ name }}</p>
    <p>{{ getEmail() }}</p>
    <p>{{ address }}</p>
</div>
Property Binding
<button [disabled]="!allowAddUser">Add user</button>
export class UsersComponent {
  allowAddUser = false;
}
Some people prefer the bind- prefix alternative, known as the canonical form:
<img bind-src="carImageUrl">
Element properties may be the more common targets, but Angular looks first to see if the name is a property of a known directive:
<div [ngClass]="classes">[ngClass] binding to the classes property</div>
Custom property binding
// app-server-element
export class ServerElementComponent implements OnInit {
  @Input('srvElement') element: { type: string, name: string };
}
and then in parent component template:
<app-server-element [srvElement]="serverElement"></app-server-element>
srvElement is an alias - a property name outside of the component.
Custom Event Binding
export class UsersComponent {
  userCreationStatus = 'No user was created!';
  userName = '';

  onCreateUser() {
    this.userCreationStatus = 'User was created!'
  }

  onUpdateUserName(event: Event) {
    this.userName = (<HTMLInputElement>event.target).value;
  }
}
<input type="text" (input)="onUpdateUserName($event)">
<button (click)="onCreateUser()">Add user</button>
Custom event binding
Child component:
export class CockpitComponent implements OnInit {
  @Output('srvCreated') serverCreated = new EventEmitter<{ serverName: string, serverContent: string }>();

  newServerName = '';
  newServerContent = '';

  onAddServer() {
    this.serverCreated.emit({
      serverName: this.newServerName,
      serverContent: this.newServerContent
    });
  }
}
srvCreated is an alias - a event name outside of the component.
<label>Server Name</label>
<input type="text" [(ngModel)]="newServerName">

<label>Server Content</label>
<input type="text" [(ngModel)]="newServerContent">

<button (click)="onAddServer()">Add Server</button>
Parent component:
export class AppComponent {
  serverElements = [];

  onServerAdded(serverData: { name: string, content: string }) {
    this.serverElements.push({
      name: serverData.name,
      content: serverData.content
    });
  }
}
<div>
  <app-cockpit
    (srvCreated)="onServerAdded($event)">
  </app-cockpit>
  ...
<div>
Two-Way-Binding
export class UsersComponent {
  userName = 'User name';
}
<input type="text" [(ngModel)]="userName">
Directives
Directives are Instructions in the DOM!
@Directive({
  selector: '[appTurnGreen]'
})
export class TurnGreenDirective {

}
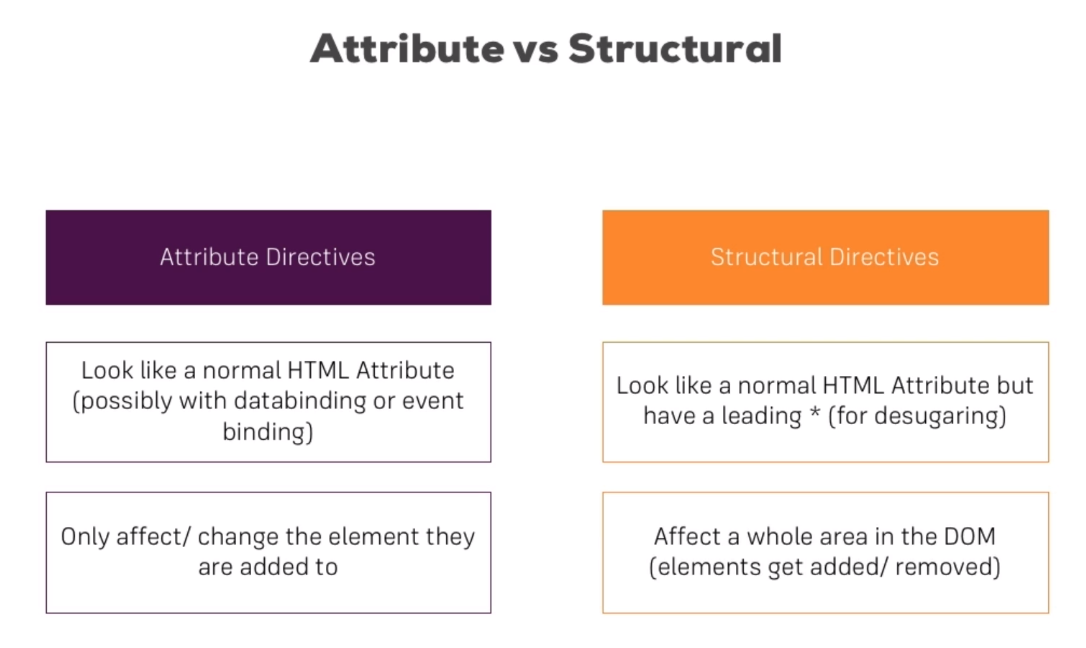
Directive types:
- Structural directives - change the DOM, add or remove elements. Only one structural directive is allowed per element.
- Attribute directives - only change the element they were placed on
ngIf
It is structural directive.
<p *ngIf="expression to evaluate">Some text</p>
The p element added or removed from the DOM (not hided) based on provided expression.
ngIf with an Else Condition
<p *ngIf="serverCreated; else noServer">Server {{ serverName }} was created</p>
<ng-template #noServer>
  <p>No server was created</p>
</ng-template>
ngSwitch
<div [ngSwitch]="value">
  <p *ngSwitchCase="5">Value is 5</p>
  <p *ngSwitchCase="10">Value is 10</p>
  <p *ngSwitchCase="15">Value is 15</p>
  <p>Value is Default</p>
</div>
ngFor
It is structural directive.
<app-server *ngFor="let server of servers"></app-server>
servers - array property in TypeScript class.
Getting the Index when using ngFor
<div *ngFor="let log of logs; let i = index">
 Log number {{ i }}
</div>
index - like a reserved expresssion
ngStyle
It is attribute directive.
<p [ngStyle]="{backgroundColor: getColor()}">Server {{ serverId }} is {{ getServerStatus() }}</p>
ngClass
It is attribute directive.
It only adds a CSS class if a certain condition is true.
<p [ngClass]="{online: serverStatus === 'online'}">Server {{ serverId }} is {{ getServerStatus() }}</p>
online is a CSS class name.
Custom attribute directive
Using direct reference to the element (
ElemenntRef) isn’t the best approach. Use Renderer instead.
import { Directive, OnInit, ElementRef } from '@angular/core';

@Directive({
  selector: '[appBasicHighlight]'
})
export class BasicHighlightDirective implements OnInit {
  constructor(private elementRef: ElementRef) {
  }

  ngOnInit() {
    this.elementRef.nativeElement.style.backgroundColor = 'green';
  }
}
Register directive in declarations array of you module and then use it:
<p appBasicHighlight>Style me with a basic directive!</p>
The better approach using Renderer. This approach is better because Angular isn’t limited to run in the browser, for example it can be run in service workers and etc.
import { Directive, OnInit, ElementRef, Renderer2 } from '@angular/core';

@Directive({
  selector: '[appBetterHighlight]'
})
export class BetterHighlightDirective implements OnInit {
  constructor(private elementRef: ElementRef,
              private renderer: Renderer2) {
  }

  ngOnInit() {
    this.renderer.setStyle(this.elementRef.nativeElement, 'background-color', 'blue', false, false);
  }
}
HostListener
To make directive reactive to events.
import { Directive, ElementRef, Renderer2, HostListener } from '@angular/core';

@Directive({
  selector: '[appBetterHighlight]'
})
export class BetterHighlightDirective {
  constructor(private elementRef: ElementRef,
              private renderer: RendererV2) {
  }

  @HostListener('mouseenter') mouseover(eventData: Event) {
    this.renderer.setStyle(this.elementRef.nativeElement,
     'background-color', 'blue', false, false);
  }

  @HostListener('mouseleave') mouseleave(eventData: Event {
    this.renderer.setStyle(this.elementRef.nativeElement,
     'background-color', 'transparent', false, false);
  }
}
HostBinding
HostBinding is more simple way than using Renderer in some cases.
In this example binding to directive properties is also demonstraited.
import { Directive, OnInit, HostListener, HostBinding } from '@angular/core';

@Directive({
  selector: '[appBetterHighlight]'
})
export class BetterHighlightDirective implements OnInit {
  @Input() defaultColor: string = 'transparent';
  @Input() highlightColor: string = 'blue';

  @HostBinding('style.backgroundColor') backgroundColor: string;

  constructor() {
  }

  ngOnInit() {
    this.backgroundColor = this.defaultColor;
  }

  @HostListener('mouseenter') mouseover(eventData: Event) {
    this.backgroundColor = this.highlightColor;
  }

  @HostListener('mouseleave') mouseleave(eventData: Event {
    this.backgroundColor = this.defaultColor;
  }
}
<p appBetterHighlight
  [defaultColor]="'yellow'"
  [highlightColor]="'red'">Custom directive here!</p>
Custom structural directive
UnlessDirective is a opposite directive to ngIf.
import { Directive, Input, TemplateRef, ViewContainerRef } from '@angular/core';

@Directive({
  selector: '[appUnless]'
})
export class UnlessDirective {
  @Input() set appUnless(condition: boolean) {
    if(!condition) {
      this.vcRef.createEmbeddedView(this.templateRef);
    } else {
      this.vcRef.clear();
    }
  }

  constructor(private templateRef: TemplateRef<any>,
              private vcRef: ViewContainerRef) {
  }

}
<div *appUnless="condition"></div>
Services
Create service:
export class LoggingService {
  log (message: string) {
    console.log(message);
  }
}

// if service depends on other service
// you should mark it as Injectable
@Injectable()
export class AccountingService {
  constructor(private logService: LoggingService) {}
}
Register/Provide service in module or component:
@NgModule({
  ...
  providers: [LoggingService]
  ...
})

//or

@Component({
  ...
  providers: [LoggingService]
  ...
})
Use service in components and other services:
export class SomeComponent {
  constructor(private logService: LoggingService) {}
}
In Angular 6+ you can:
@Injectable({providedIn: 'root'})
export class MyService { ... }

// it is the same as
export class MyService { ... }
// and
import { MyService } from './path/to/my.service';

@NgModule({
    ...
    providers: [MyService]
})
export class AppModule { ... }
Angular use Hierarchical Injector.
- AppModule level - same Instance of Service is available Application-wide
- AppComponent - same Instance of Service is available for all Components (but not for other Services)
- Any other Component - same Instance of Service is available for the Component and all its child components
Service registration on lower level is override service registration on higher level.
You can use EventEmiters in services to provide some publish-subscriber behaviour.
Routing
Setting up and loading Routes
- Add
const appRoutes: Routes - Add
RouterModule.forRoot(appRoutes) - Add
<router-outlet>- place for displaying components
const appRoutes: Routes = [
  { path: '', component: HomeComponent },
  { path: 'users', component: UsersComponent },
  { path: 'servers', component: ServersComponent }
]

@NgModule({
  declarations: [
    ...
  ],
  imports: [
    BrowserModule,
    FormsModule,
    RouterModule.forRoot(appRoutes)
  ],
  providers: [ServersService],
  bootstrap: [AppComponent]
})
export class AppModule { }
Navigating with Router Links
routerLink="/" directive
  <li><a routerLink="/" routerLinkActive="active" [routerLinkActiveOptions]="{exact: true}">Home</a></li>
  <li><a routerLink="/servers" routerLinkActive="active" >Servers</a></li>
  <li><a [routerLink]="['/users']" routerLinkActive="active" >Users</a></li>
routerLinkActive - to mark active
Navigating programmatically
this.router.navigate(['/users']);
Route parameters
const appRoutes: Routes = [
  { path: 'users/:id', component: UsersComponent }
]

// to get route param value
this.route.snapshot.params['id']
// route is ActivatedRoute

this.route.params.subscribe(
  (params: Params) => {
    this.user.id = params['id'];
    this.user.name = params['name'];
  }
);
Query Parameters and Fragments
<a
  [routerLink]="['/servers', 5, 'edit']"
  [queryParams]="{allowEdit: '1'}"
  fragment="loading"
  ...>
  {{ server.name }}
</a>
this.router.navigate(['/servers', id, 'edit'], {queryParams: {allowEdit: '1'}, fragment: 'loading'})

// to get
this.route.snapshot.queryParams
this.route.snapshot.fragment
Nested (child) routes
const appRoutes: Routes = [
  { path: '', component: HomeComponent },
  { path: 'users', component: UsersComponent, children: [
    { path: ':id/:name', component: UserComponent}
  ] },
  { path: 'servers', component: ServersComponent, children: [
    { path: ':id', component: ServerComponent },
    { path: ':id/edit', component: EditServerComponent },
  ] }
]
In users and servers component templates add <router-outlet></router-outlet>
Forms
- Reactive
- Template-driven