Automate and integrate your business processes
Business processes modeled in software are often called workflows.
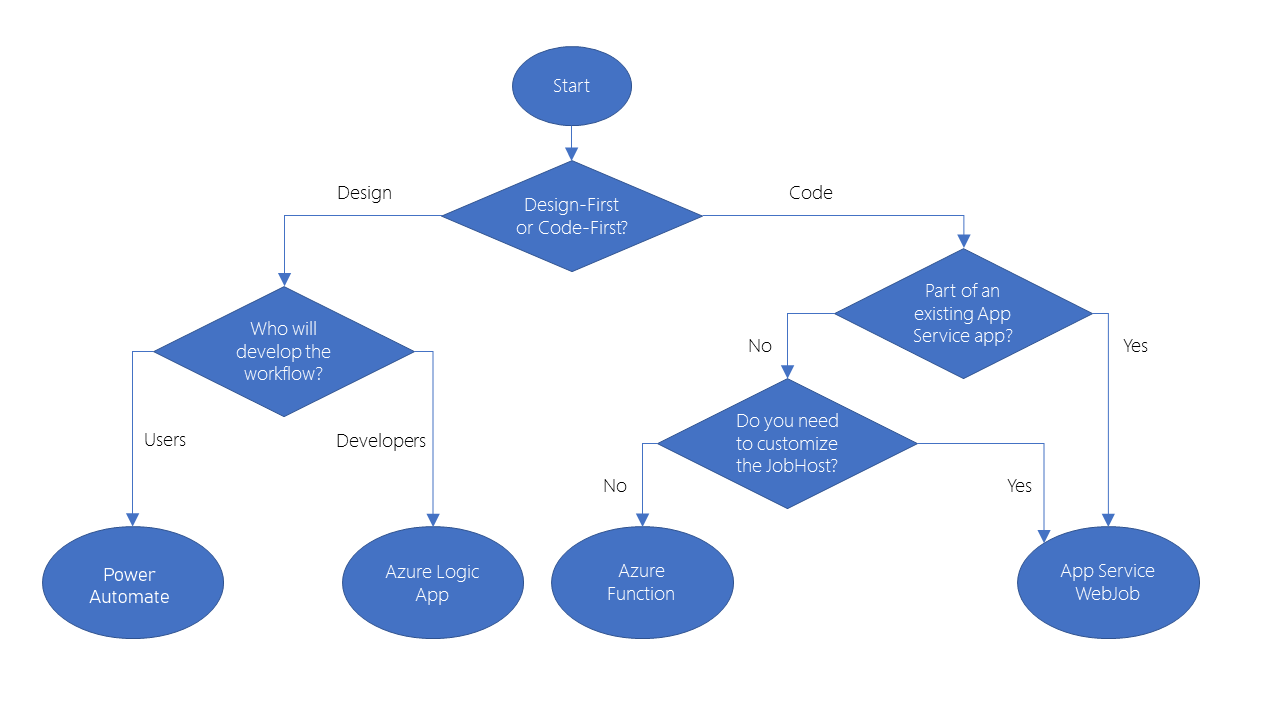
Azure includes four different technologies that you can use to build and implement workflows that integrate multiple systems:
- Logic Apps
- Microsoft Power Automate
- WebJobs
- Azure Functions
Design-first approach: Logic Apps, Microsoft Power Automate Code-first: WebJobs, Azure Functions
Logic Apps has more than 200 connectors to different services and you can create custom connector.
Microsoft Power Automate is a service that you can use to create workflows even when you have no development or IT Pro experience. Under the hood, Microsoft Power Automate is built on Logic Apps.
You may choose WebJobs for the following reasons:
- You want the code to be a part of an existing App Service application and to be managed as part of that application, for example in the same Azure DevOps environment.
- You need close control over the object that listens for events that trigger the code. This object in question is the JobHost class, and you have more flexibility to modify its behavior in WebJobs.
How to choose a service
Azure Functions
Benefits:
- no servers to manage
- automatic scaling
- you are charged based on what is used
- support many languages
Drawbacks:
- Execution time. By default, functions have a timeout of 5 minutes. This timeout is configurable to a maximum of 10 minutes. If your function requires more than 10 minutes to execute, you can host it on a VM. Additionally, if your service is initiated through an HTTP request and you expect that value as an HTTP response, the timeout is further restricted to 2.5 minutes. Finally, there’s also an option called Durable Functions that allows you to orchestrate the executions of multiple functions without any timeout.
- Execution frequency. If you expect your function to be executed continuously by multiple clients, it would be prudent to estimate the usage and calculate the cost of using functions accordingly. It might be cheaper to host your service on a VM. While scaling, only one function app instance can be created every 10 seconds, for up to 200 total instances. Keep in mind, each instance can service multiple concurrent executions, so there is no set limit on how much traffic a single instance can handle. Different types of triggers have different scaling requirements
Functions are event driven.
Triggers are used to execute function.
Bindings are a declarative way to connect data and services to your function. Each binding has a direction - your code reads data from input bindings, and writes data to output bindings.
Service plans:
- Consumption service plan. The Consumption service plan provides automatic scaling and bills you when your functions are running. The Consumption plan comes with a configurable timeout period for the execution of a function. By default, it is 5 minutes, but may be configured to have a timeout as long as 10 minutes.
- Azure App Service plan. The plan allows you to avoid timeout periods by having your function run continuously on a VM that you define. When using an App Service plan, you are responsible for managing the app resources the function runs on, so this is technically not a serverless plan. However, it may be a better choice if your functions are used continuously or if your functions require more processing power or execution time than the Consumption plan can provide.
Call function:
curl --header "Content-Type: application/json" --header "x-functions-key: cjrX2qERTCjewqv3eiRcAzkSPFazCBjrTLn3ZfSKaEtgAa0lnbXROA==" --request POST --data "{\"name\": \"Azure Function\"}" https://escalator-functions-asem85.azurewebsites.net/api/HttpTrigger1
Triggers
- Time trigger - CRON expressions are used.
- HTTP trigger
- Blob trigger
Bindings
- Blob Storage
- Azure Service Bus Queues
- Azure Cosmos DB
- Azure Event Hubs
- External Files
- External Tables
- HTTP endpoints
Durable functions
Durable Functions is an extension of Azure Functions that enables you to perform long-lasting, stateful operations in Azure. Azure provides the infrastructure for maintaining state information. You can use Durable Functions to orchestrate a long-running workflow.
You can use three durable function types: Client, Orchestrator, and Activity.
Client functions are the entry point for creating an instance of a Durable Functions orchestration. They can run in response to an event from many sources, such as a new HTTP request arriving, a message being posted to a message queue, an event arriving in an event stream. You can write them in any of the supported languages.
Orchestrator functions describe how actions are executed, and the order in which they are run. You write the orchestration logic in code (C# or JavaScript).
Activity functions are the basic units of work in a durable function orchestration. An activity function contains the actual work performed by the tasks being orchestrated.
Application patterns
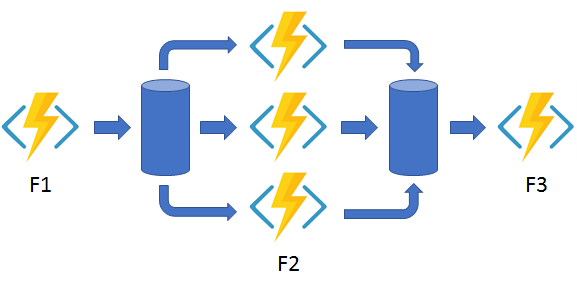
Function chaining - In this pattern, the workflow executes a sequence of functions in a specified order. The output of one function is applied to the input of the next function in the sequence. The output of the final function is used to generate a result.

Fan out/fan in - This pattern runs multiple functions in parallel and then waits for all the functions to finish. The results of the parallel executions can be aggregated or used to compute a final result.
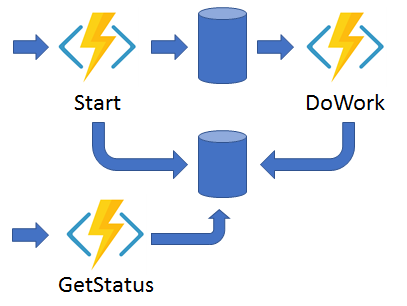
Async HTTP APIs - This pattern addresses the problem of coordinating state of long-running operations with external clients. An HTTP call can trigger the long-running action. Then, it can redirect the client to a status endpoint. The client can learn when the operation is finished by polling this endpoint.
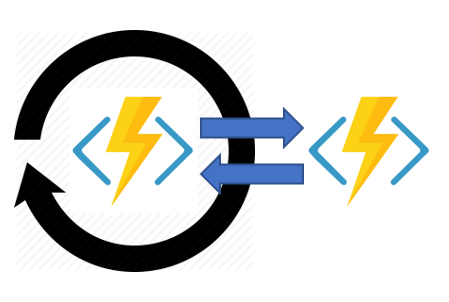
Monitor - This pattern implements a recurring process in a workflow, possibly looking for a change in state. For example, you could use this pattern to poll until specific conditions are met.
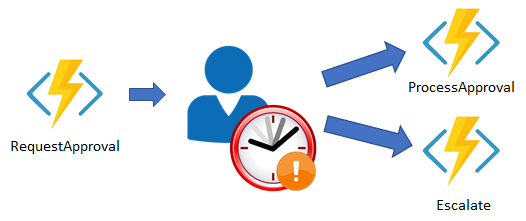
Human interaction - This pattern combines automated processes that also involve some human interaction. A manual process within an automated process is tricky because people aren’t as highly available and as responsive as most computers. Human interaction can be incorporated using timeouts and compensation logic that runs if the human fails to interact correctly within a specified response time. An approval process is an example of a process that involves human interaction.
Aggregator (stateful entities) The sixth pattern is about aggregating event data over a period of time into a single, addressable entity. In this pattern, the data being aggregated may come from multiple sources, may be delivered in batches, or may be scattered over long-periods of time. The aggregator might need to take action on event data as it arrives, and external clients may need to query the aggregated data.
The tricky thing about trying to implement this pattern with normal, stateless functions is that concurrency control becomes a huge challenge. Not only do you need to worry about multiple threads modifying the same data at the same time, you also need to worry about ensuring that the aggregator only runs on a single VM at a time.
You can use Durable entities to easily implement this pattern as a single function.
Timers in durable functions
Using timers for delay:
const df = require("durable-functions");
const moment = require("moment");

module.exports = df.orchestrator(function*(context) {
    for (let i = 0; i < 10; i++) {
        const deadline = moment.utc(context.df.currentUtcDateTime).add(i, 'd');
        yield context.df.createTimer(deadline.toDate());
        yield context.df.callActivity("SendReminder");
    }
});
Using timers for timeout:
module.exports = df.orchestrator(function* (context) {
    const outputs = [];
    const deadline = moment.utc(context.df.currentUtcDateTime).add(20, "s");
    const activityTask = context.df.waitForExternalEvent("Approval");
    const timeoutTask = context.df.createTimer(deadline.toDate());

    const winner = yield context.df.Task.any([activityTask, timeoutTask]);
    if (winner === activityTask) {
        outputs.push(yield context.df.callActivity("Approval", "Approved"));
    }
    else
    {
        outputs.push(yield context.df.callActivity("Escalation", "Head of department"));
    }

    if (!timeoutTask.isCompleted) {
        // All pending timers must be complete or canceled before the function exits.
        timeoutTask.cancel();
    }

    return outputs;
})
Azure Functions Core Tools
The Azure Functions Core Tools are a set of command-line tools that you can use to develop and test Azure Functions on your local computer.
The Core Tools feature a variety of functions-related capabilities, but their primary purpose is to:
- Generate the files and folders you need to develop functions on your local computer
- Run your functions locally so you can test and debug them
- Publish your functions to Azure
The Core Tools are packaged as a single command-line utility named func.
Run function as background process in Cloud Shell:
func start &> ~/output.txt &
Develop & Test locally with Core Tools and then:
- Create Azure Function App resource using Azure CLI, Azure Power Shell or Azure Portal
- Publish local function app project to resource
# step 1

RESOURCEGROUP=learn-90b0409d-d217-4a99-a4bc-32a4448d0830
STORAGEACCT=learnstorage$(openssl rand -hex 5)
FUNCTIONAPP=learnfunctions$(openssl rand -hex 5)

az storage account create \
  --resource-group "$RESOURCEGROUP" \
  --name "$STORAGEACCT" \
  --kind StorageV2 \
  --location centralus

az functionapp create \
  --resource-group "$RESOURCEGROUP" \
  --name "$FUNCTIONAPP" \
  --storage-account "$STORAGEACCT" \
  --runtime node \
  --consumption-plan-location centralus \
  --functions-version 2

# step 2

cd ~/loan-wizard
func azure functionapp publish "$FUNCTIONAPP"
Visual Studio Code
In the Cloud Shell, run the following command and copy the tenant ID to your clipboard.
az account list --query "[?name=='Concierge Subscription'].tenantId" -o tsv
- Open settings in Visual Studio Code. On Windows or Linux, select File > Preferences > Settings. On macOS, select Code > Preferences > Settings.
- Navigate through User Settings > Extensions > Azure configuration
- Enter the tenant in the Azure: Tenant textbox.
Select Subscription:
- Click on the Azure extension icon.
- Under the Functions heading, click on Select Subscriptions.
Press F1 and you can select commands:
- Azure: Sign Out
- Azure: Sign In
- Azure Functions: Deploy to Function App
- Azure Functions: Upload local settings
- Azure Storage: Configure Static Website
- Azure Storage: Deploy to Static Website
- Azure Storage: Browse static website
- Azure Functions: Open in portal
Azure API Management
You can use API Management to integrate different microservices and present them to client applications with consistent behavior at a single URL.
The Azure API management service is hosted in the Azure cloud and is positioned between your APIs and the Internet. An Azure API gateway is an instance of the Azure API management service.
- API documentation. Documentation of APIs enables calling clients to quickly integrate their solutions. API Management allows you to quickly expose the structure of your API to calling clients through modern standards like Open API. You can have more than one version of an API. With multiple versions, you can stage app updates as your consuming apps don’t have to use the new version straight away.
- Rate limiting access. If your API could potentially access a large amount of data, it’s a good idea to limit the rate at which clients can request data. Rate limiting helps maintain optimal response times for every client. API Management let you set rate limits as a whole or for specific individual clients.
- Health monitoring. APIs are consumed by remote clients. So it can be difficult to identify potential problems or errors. API Management lets you view error responses and log files, and filter by types of responses.
- Modern formats like JSON. APIs have used many different data exchange formats over the years from XML to CSV and many more. API Management enables you to expose these formats using modern data models like JSON.
- Connections to any API. In many businesses, APIs are located across different countries and use different formats. API Management lets you add all of these disparate APIs into single modern interface.
- Analytics. As you develop your APIs, it’s useful to see how often your APIs are being called and by which types of systems. API Management allows you to visualize this data within the Azure portal.
- Security. Security is paramount when dealing with system data. Unauthorized breaches can cost companies money, time lost in reworking code, and reputational loss. Security tools that you can use with Azure API management include OAuth 2.0 user authorization, and integration with Azure Active Directory.
The API gateway is the endpoint that:
- Accepts API calls and routes them to the backend.
- Verifies API keys, JWT tokens, certificates, and other credentials.
- Enforces usage quotas and rate limits.
- Transforms your API on the fly without code modifications.
- Caches backend responses where set up.
- Logs call metadata for analytics purposes.
Subscription keys are used to restrict access to an API.
Subscription scopes:
- All APIs
- Single API
- Product
curl --header "Ocp-Apim-Subscription-Key: <key string>" https://<apim gateway>.azure-api.net/api/path

curl https://<apim gateway>.azure-api.net/api/path?subscription-key=<key string>
API Management policies
In Azure API Management, policies execute at four different times:
- Inbound. These policies execute when a request is received from a client.
- Backend. These policies execute before a request is forwarded to a managed API.
- Outbound. These policies execute before a response is sent to a client.
- On-Error. These policies execute when an exception is raised.
<policies>
    <inbound>
        <base />
        <check-header name="Authorization" failed-check-httpcode="401" failed-check-error-message="Not authorized" ignore-case="false">
        </check-header>
    </inbound>
    <backend>
        <base />
    </backend>
    <outbound>
        <base />
        <json-to-xml apply="always" consider-accept-header="false" parse-date="false" />
    </outbound>
    <on-error>
        <base />
    </on-error>
</policies>
Policy scopes:
- Global scope
- Product scope
- API policy scope
- Operation policy scope
Using an external cache
API Management instances usually have an internal cache, which is used to store prepared responses to requests. However, if you prefer, you can use an external cache instead. One possible external cache system that you can use is the Azure Cache for Redis service.
You might choose to use an external cache because:
- You want to avoid the cache being cleared when the API Management service is updated.
- You want to have greater control over the cache configuration than the internal cache allows.
- You want to cache more data than can be store in the internal cache.
Another reason to configure an external cache is that you want to use caching with the consumption pricing tier. This tier follows serverless design principal and you should use it with serverless web APIs. For this reason, it has no internal cache. If you want to use caching with an API Management instance in the consumption tier, you must use an external cache.